Profile Management: Your Account Overview
Access Level
All authenticated users
Overview
Your profile is your personal space in the Match Official System where you manage all your account settings, personal information, and preferences.
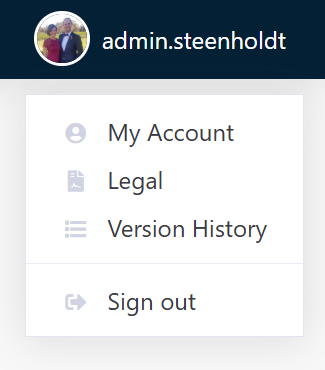
How to Access: Click My Account then Update Profile
Accessing Your Profile
- Log in to Match Official System
- Click My Account → Update Profile
- The Update Profile page opens showing your profile information and sections you can edit
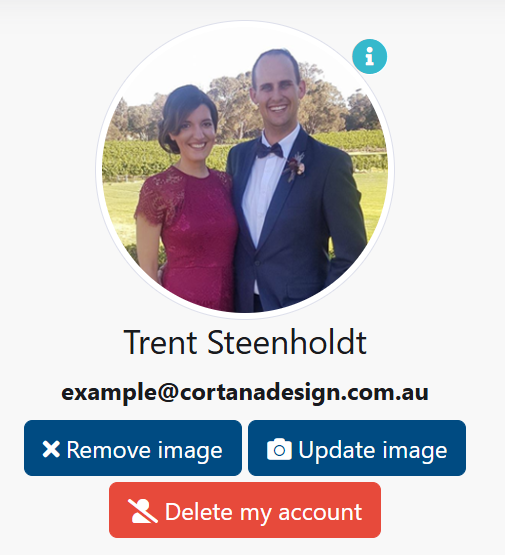
Profile Overview
Your profile page displays:
- Profile Picture - A circular profile photo
- Full Name - Your registered name
- Email Address - Your contact email
- Group Associations - Logos of groups or associations you belong to
- Action Buttons:
- Remove Image
- Update Image
- Delete My Account
Managing Your Profile Picture
Upload a Profile Picture
- Click the Update Image button (camera icon)
- A modal dialog will open with an upload interface
- Select an image file from your computer
- Confirm the upload
- The image will be cropped to a circular format
Requirements for Profile Pictures
- Formats Supported: JPG, PNG, GIF
- Size: Recommended maximum 5MB
- Dimensions: Square images work best (will be cropped to a circle)
- Content: Use a professional, clear headshot or portrait
Remove Your Profile Picture
- Click the Remove Image button (X icon)
- Your profile picture will be removed and replaced with a default avatar
- You can upload a new image anytime
Multi-Group Profile Pictures
If you belong to multiple groups or associations, you can have different profile pictures for each group. A small info icon will appear indicating this feature.
About Me Section
Share a brief biography or introduction with other members:
Edit Your About Me
- Scroll to the About Me section
- Click in the text editor
- Write a brief description of yourself (100-500 words recommended)
- Format your text using the rich text editor:
- Bold and Italic text
- Lists and formatting
- Links to external resources
- Click Save
Tips:
- Be professional and welcoming
- Mention your role, interests, and experience
- This appears on your public profile to other group members
Profile Details
The Profile Details section stores additional personal information:
Shirt Size
Enter your shirt size (e.g., S, M, L, XL, XXL). This may be used for:
- Merchandise ordering
- Event coordination
- Uniform requirements
Pants Size
Enter your pants size (e.g., 28, 30, 32, 34, 36, 38, 40). Used for similar purposes as shirt size.
Joined Your Group
Select the year or date you joined your current group or association from the dropdown list.
Occupation / Job
Enter your current job title or occupation. This helps colleagues understand your role and background.
Email Preferences
Unsubscribe from MOS Automated Emails
Control which automatic system emails you receive:
- No (default) - Receive all automated emails including:
- Diary reviewed notifications
- Diary viewed notifications
- Assessment updates
- Group announcements
- Yes - Stop receiving automated emails (you can still receive direct messages)
Notification Preferences
Choose which emails you receive and how often.
Email Notifications
- Assessment updates (assigned, due soon, results available)
- Group announcements and resources
- Account activity alerts
Frequency
- Immediate, Daily digest, Weekly digest, or Never
How to update:
- Open My Account → Update Profile.
- Find Email Preferences or Notifications.
- Select the types and frequency you want.
- Click Save Preferences.
Your Address
Your address information is used for official correspondence and event coordination. The system stores a single formatted address line selected from Google Maps search.
How to Update Your Address
The system uses Google Maps address search to make updating your address quick and accurate.
Update Your Address
- Scroll to the Your address section
- Click in the Search Address field
- Start typing your address (e.g., "123 Main Street, Sydney NSW 2000")
- Select your address from the dropdown suggestions that appear
- Your selection appears in the Current Address field below
- Click Save
- A confirmation message appears once saved
Search Tips
- Include a street number and street name for best results
- Add city/region details if you need a more precise match
- Select from the suggested addresses to ensure accuracy
Current Address Display
The Current Address field shows your saved address in a single line format. This is a read-only field that displays your current registered address.
Contact Numbers
Phone Number (required)
- Primary phone contact
- Accepts digits, +, spaces, and hyphens
- Example: "+61 2 1234 5678" or "02 1234 5678"
Work Number (optional)
- Alternative work phone number
- Same format as phone number
Secondary Number (optional)
- Additional contact number (mobile, alternative)
- Same format as phone number
Saving Your Information
- Update your address using the search field
- Fill in or update your contact numbers
- Click Save
- The system validates your information
- A confirmation message appears once saved
Address Validation
The system validates:
- Required fields are completed
- Phone numbers contain only valid characters (digits, +, spaces, hyphens)
- Address is selected from the search suggestions
If validation fails, error messages will appear near the save button.
Privacy and Visibility
Control who can see your profile and where you appear.
Profile Visibility
- Public
- Group Members Only
- Managers Only
- Private
Discoverability
- Show in directory searches
- Show in group member lists
- Include in administrative reports
How to update:
- Open My Account → Update Profile.
- Find Privacy or Visibility.
- Choose your preferences and click Save.
Theme Selection
Customise the appearance of the MOS interface with different colour schemes including dark mode.
Available Themes
Click on theme thumbnails to preview different colour schemes. Your organisation may offer both light and dark themes.
Light Themes:
- Bright backgrounds with dark text
- Better for daytime use and bright environments
Dark Mode:
- Dark backgrounds with light text
- Reduces eye strain in low-light environments
Applying a Theme
- Scroll to the Theme section
- Click on the theme thumbnail you prefer (light or dark)
- The theme will apply immediately to your interface
- Your selection is saved automatically
Theme Preferences
Your theme preference:
- Applies to your account only
- Syncs across all sessions
- Does not affect other users
- Can be changed anytime
- Names and exact colours may vary by configuration
Language and Time Zone
Set regional preferences for dates, times, and interface language.
Language
- Choose your preferred language (where available)
- The interface reloads in the selected language
Time Zone
- Select your time zone so dates/times match your region
Number and Date Format
- Choose date format (e.g., DD/MM/YYYY or MM/DD/YYYY)
- Choose 12-hour or 24-hour time
How to update:
- Open My Account → Update Profile.
- Find Language or Regional settings.
- Select options and click Save.
Accessibility
Improve readability and navigation.
Font Size
- Small, Medium, Large, Extra Large
High Contrast Mode
- Increases contrast for easier reading
Keyboard Navigation
- Navigate using Tab and arrow keys; press Enter to activate buttons
How to update:
- Open My Account → Update Profile.
- Find Accessibility.
- Choose options and click Save.
Event Log
Your activity log shows all major events on your account:
Viewing Your Event Log
The event log displays:
- Event - Description of the action (login, profile update, etc.)
- Date/Time - When the event occurred
Types of Events
- Account login (if enabled)
- Profile information updates
- Picture changes
- Preference changes
- Assessment activity
- Group changes
Showing Login Events
By default, login events may be hidden. To view them:
- Scroll to the Event Log section
- Check the box "Show login events"
- Login events will now appear in the log
- Uncheck to hide them again
Event Log Information
- Events are displayed in reverse chronological order (newest first)
- The log shows 15 events per page
- Use the page numbers or Previous/Next links to move between pages
- Dates are shown in your local date and time format
Deleting Your Account
Warning: This action is permanent and cannot be undone.
Account Deletion Process
- Click the Delete My Account button (trash icon)
- A confirmation dialog will appear with the message:
"By clicking the button below your MOS account, along with all its data will be deleted. Deleting your account and its data is irreversible."
- Read the warning carefully
- Click "Delete my account and all its data" to confirm
- You will be immediately logged out
- All your data will be permanently removed from the system
Before Deleting Your Account
Consider:
- Export any important data or reports you need
- Notify your group administrator
- Ensure you have backed up any information
- Contact your administrator if you only want to pause your membership
After Account Deletion
- You cannot log back in with your credentials
- All assessments, reviews, and media associated with your account will be deleted
- Your group will no longer have access to your information
- To rejoin, contact your administrator for a new account
Best Practices for Profile Management
- ✅ Keep information current - update address, phone numbers, and job title
- ✅ Use professional photos - upload a clear, recognizable headshot
- ✅ Complete your biography - summarize your background and expertise
- ✅ Review permissions - confirm email preferences and visibility settings
- ✅ Verify contact information - ensure accuracy for official correspondence
- ✅ Monitor your event log - watch for unauthorized or unexpected activity
Troubleshooting
Profile Picture Won't Upload
- Check file size (under 5MB recommended)
- Ensure file format is JPG, PNG, or GIF
- Try a different image
- Clear your browser cache and try again
Address Validation Errors
- Ensure all required fields are completed
- Check for valid characters in each field
- Phone numbers should contain only numbers, +, spaces, and hyphens
- Make sure you selected a suggestion from the address dropdown
Changes Not Saving
- Ensure all required fields are filled
- Click the Save button for each section
- Wait for the confirmation message
- Refresh the page to verify changes were saved
Account Deletion Issues
- Ensure you're logged in with the correct account
- Verify you want to delete (this cannot be reversed)
- Contact your administrator if you cannot complete deletion
Related Resources
- About - System information and overview
- Update Profile Details - Detailed personal information guide
- Change Password - Update your password
- Update Email Address - Change your email
- Search Users - Find other members
- Frequently Asked Questions - Common questions